
TM 11-6625-596-12
(3) 4emove the three captive screws (fig. 1-2) that
secure electrical test panel 1A2A14 to top case
2-3. Tools and Test Equipment Required
assemble 1A2 and lift out 1A2A14.
for Installation
a. Tools. The TS-716/U is completely portable.
(4) Remote the six captive screws (fig. 1-3) that
No tools are required for installation.
hold test rack assembly 1A3 and panel chassis assembly
b. Test Equipment. The TS-716/U has been
1A4 in bottom case assembly 1A1. Lift the dual chassis
calibrated, and settings have been sealed at the factory.
by the two handles on panel chassis assembly 1A4 and
Installation testing is not required before use.
remove the dual chassis from bottom case assembly
1A1.
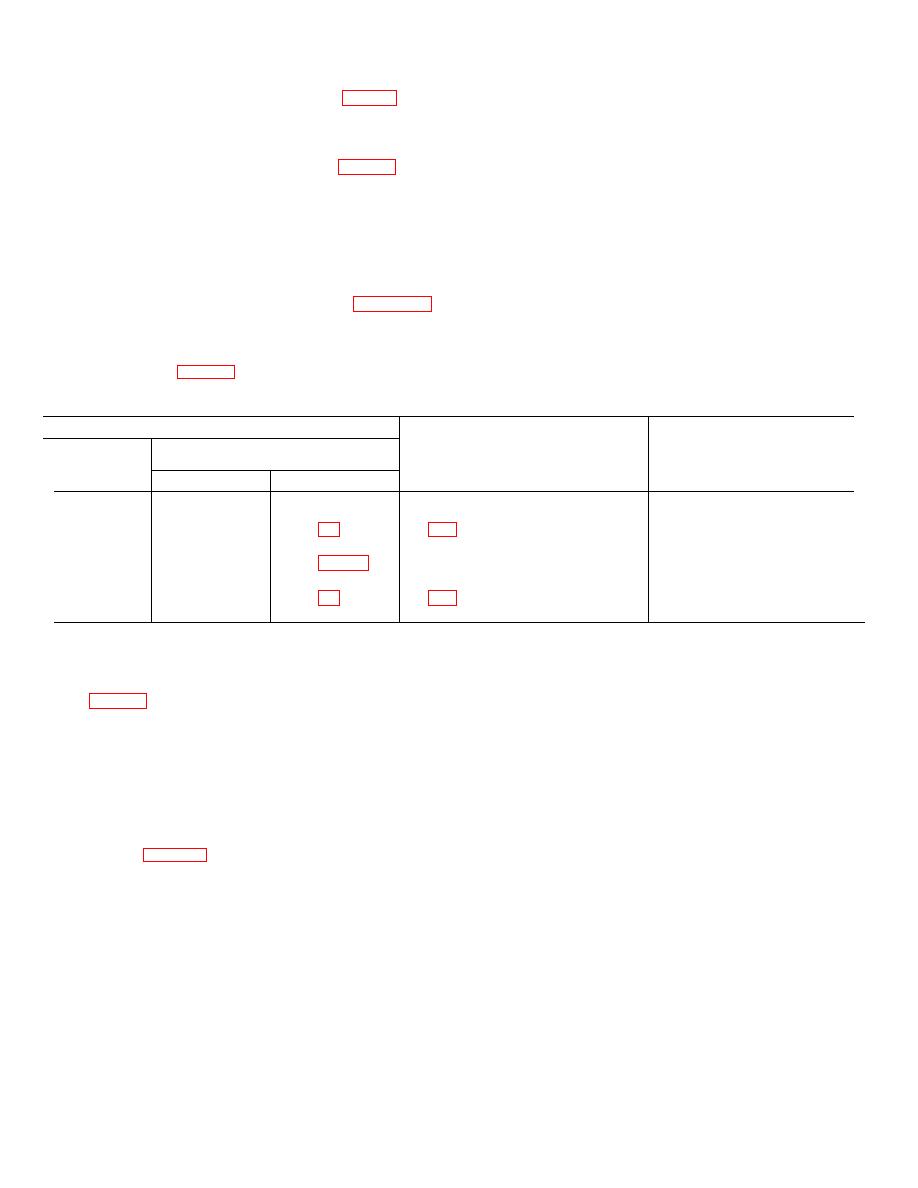
2-4. Installation of Fuses
The TS-716/U is shipped with the fuses installed. See
(5) Unlock the three quick disconnect latches on
that the fuses installed in each fuseholder are of the
the side of the dual chassis as shown in figure 1-1.
values given adjacent to the fuseholder and as listed in
Inspect all wiring for breaks or abrasion. Check the
the chart below.
actuation of the pushbutton and rotary switches on panel
CAUTION
chassis assembly 1A4. Insure that assemblies 1A3A1
Use only fuses of the correct value when
through 1A3A10 (fig. 1-4) are properly seated in their
replacing a fuse. Overfusing can result in
sockets in test rack assembly 1A3.
damage to the equipment.
Fuse
Reference
Rating
Location
Circuit protected
designation
Current
Voltage
A3Fl
1/16 amp
250
Test rack assembly 1A3
20ertz inverter
(slow blow)
1A4F2 and
3/16 amp
250
Panel chassis assembly 1A4
230volt ac input
F3
(slow blow)
A4F4sand
3/8 amp
250
Panel chassis assembly 1A4
11-volt ac input
F5
(slow blow)
2-5. Connections
e.
The cables that attach electrical test panel
1A2A14 to panel chassis assembly front panel 1A4 are
a.
Close the dual chassis assembly (1A3 and
permanently installed; do not attempt to remove them.
1A4. fig. 1-1), lock the three quick disconnect latches
and insert the dual chassis in bottom case
f.
The connector on the power supply cable is
assembly,1A1.
adapted for a grounding connection in the receptacle of
the power source. If a grounding connection is not
b.
Insert electrical test panel 1A2A14 in top case
available, the grounding contact should be removed from
assembly 1A2.
the power plug by removal of the two screws through the
cable clamp. Reverse the contact, so that it projects
c.
Connect the test microphone
cable
to
back along the incoming cable. Replace the two screws
1A2A14J12 and the test loudspeaker
cable
to
through "the ground and into the cable clamp, and
1A2414J.13 (figs. 2-2).
tighten 'them.
d.
Determine the input line voltage available.
2-6. Adjustments
Place the power switch in the OFF position. If the test
set is to be operated from a 115-volt ac line, loosen the
two screws that hold the guardplate over the power
The front panel calibrations are performed by the
switch and move the guardplate all the way to ,the left
operator as part of the normal 'operational procedure
To use the test, set on a 230,volt ac line move the
and are described' in T-B 11-6625-596-12/1.
switch guardplate all the way to the right. Tighten the
two screws that-hold the switchplate.
2-3


 Previous Page
